Trending Finds Readers Are Loving
Explore affordable luxe discoveries people are clicking on right now.
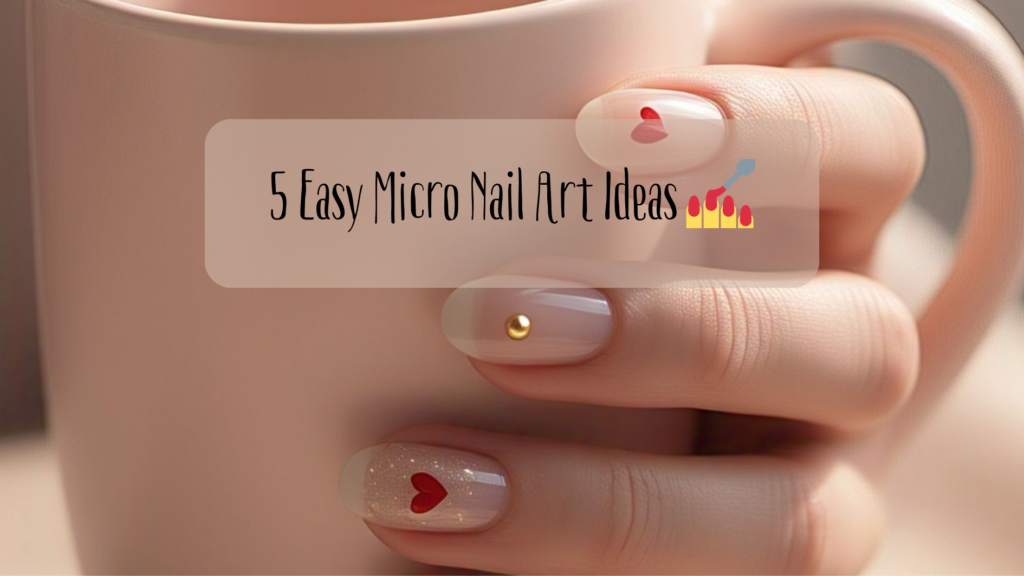
See What's TrendingBestie, if you’ve been scrolling Instagram or Pinterest lately, you’ve probably seen the rise of delicate, minimalist nail designs. This micro nail art tutorial is all about showing you how to recreate those dainty, tiny details at home — no pro skills required! 🌸✨ Micro nail art features small accents like tiny dots, stars, hearts, or minimal lines placed carefully on a simple base color. It’s perfect for anyone who loves subtle, chic designs that still pack a stylish punch. Even better, these looks are versatile and wearable for work, weekends, or special events. In this guide, I’ll walk you through five easy micro nail designs, complete with tips, tool suggestions, and style ideas to help you pull it all together. Ready to make your nails look effortlessly cool and Pinterest-worthy? Let’s get started!
1. Tiny Dots on Sheer Base
For one of the easiest micro nail designs, try adding tiny black or gold dots over a sheer nude base. After applying two thin coats of a sheer polish like Essie Mademoiselle, use a dotting tool or toothpick to place small dots along the center or near the tips of your nails. Be sure to let the dots dry completely before sealing everything with a glossy top coat. This style from the micro nail art tutorial is perfect for beginners because it’s simple yet chic. Plus, it pairs beautifully with gold jewelry, delicate rings, or minimalist outfits. Whether you’re heading to brunch or a casual coffee date, this look adds a little extra charm without feeling fussy. It’s also a fun design to experiment with color — try white dots for a softer effect or metallic dots for a more playful twist.

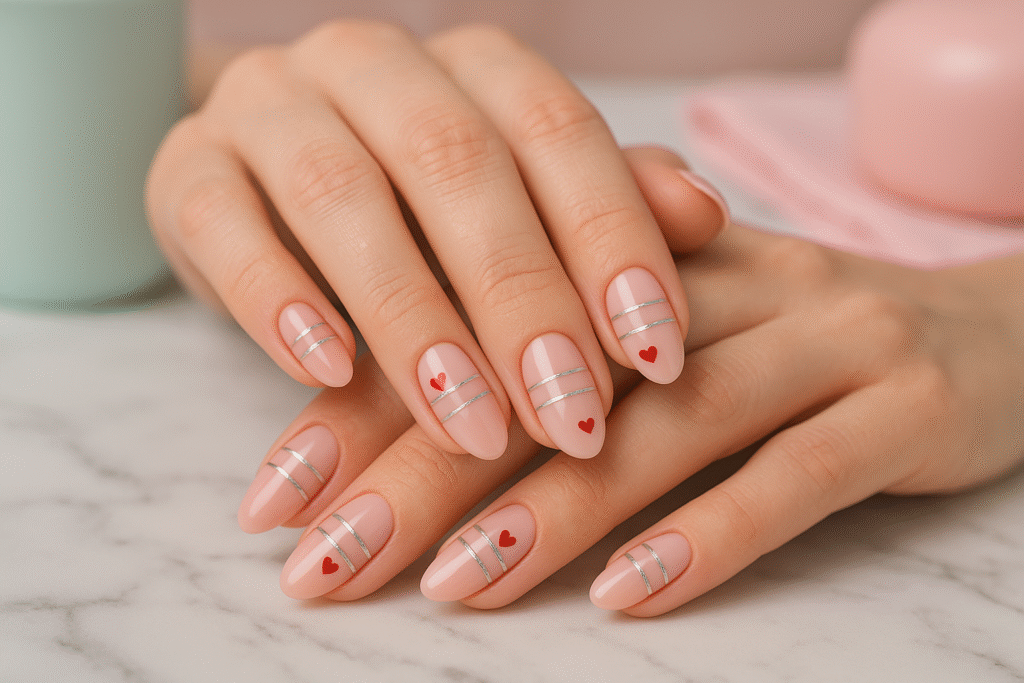
2. Micro French Tips
Looking for a fresh spin on the classic French manicure? Micro French tips are a modern take that focuses on ultra-thin lines along the tip of the nail. Start by applying a sheer or nude base coat, then use a thin detail brush to paint a delicate line at the very edge of each nail. You can choose classic white or mix it up with fun pastel shades for spring. What’s great about this micro nail art tutorial idea is how clean and understated it looks. Also, it works beautifully on all nail shapes, from short rounds to long almond tips. To finish, apply a clear top coat for added shine and durability. This design pairs perfectly with tailored blazers, crisp white shirts, or dainty jewelry, making it a go-to for work and formal events where you want your nails to look polished yet understated.

3. Tiny Stars and Celestial Details
If you love adding a touch of whimsy to your nails, tiny stars and moons are the perfect micro nail art choice. Apply a dark or neutral base and use a detail brush or fine nail sticker to add small celestial accents. This look from the micro nail art tutorial works especially well for evening events or when you want to channel soft cosmic vibes. You can keep it minimal by adding just one or two accents per hand or go a bit bolder with tiny stars scattered across all nails. Moreover, pairing this design with sparkly rings or silver accessories really ties the look together. For the best results, use high-quality nail stickers or fine brushes, and always seal the art with a durable top coat to protect your work. You’ll love how magical and unique your nails feel!
4. Micro Heart Accents
For a romantic, playful option, try tiny heart accents placed on a pale pink or sheer base. Use a small brush or a nail art pen to carefully draw tiny red or pink hearts on an accent nail or even across all your nails if you want a bolder effect. This style from the micro nail art tutorial pairs beautifully with soft girl outfits, romantic blouses, or even casual jeans and a tee for a cute contrast. Also, it’s a great look for date nights, Valentine’s Day, or anytime you want to add a little love to your style. To keep the hearts sharp and clean, practice on a piece of paper first, then apply slowly with a steady hand. Finish with a glossy top coat to make sure your cute design lasts all week long. You’ll feel extra sweet every time you look down at your hands!
5. Micro Metallic Lines
Want a sleek, fashion-forward look? Micro metallic lines add a touch of edge to your nails without going over the top. Apply a neutral or sheer base, then use metallic striping tape or a fine nail art brush to draw thin horizontal or vertical lines on one or two nails. This variation from the micro nail art tutorial is ideal for fashion lovers who want something minimal yet eye-catching. Plus, metallic details pair beautifully with edgy outfits, sleek handbags, or structured blazers, making them perfect for events or nights out. To apply the striping tape, cut tiny pieces and press them gently onto dry polish, then seal with a top coat. You’ll love how this look gives your nails an editorial, runway-inspired vibe while staying totally wearable for daily life.
Final Thoughts
This micro nail art tutorial proves that you don’t need bold colors or oversized patterns to make a statement. With just a few small details, you can transform your manicure into something chic, modern, and unique. Plus, these easy designs are perfect for trying at home or bringing to your favorite salon. Want even more style inspiration? Check out our post on 7 Fresh Ways to Style a Classic Fisherman Sweater — because fabulous nails and chic outfits always go hand in hand, bestie!


Pingback: 10 Soft Girl Spring Nail Designs That Feel Like Sunshine - Bellencia
Pingback: Milky White Glazed Nails: The Look Everyone Wants - Bellencia